
Whether you are using OpenOffice or Microsoft Word we will provide some basic rules and tips required for the assignments you will commonly receive through our program.
Here are the sections we will cover:
If you’re having trouble with page numbers in Microsoft Word, you’re not alone. We’ve received tons of comments and questions from learners like you on our Headers & Page Numbers video.
One of the most common questions is How do I restart or reformat my page numbers partway through the document? Apparently, this is a common problem for students who are working on academic papers.
Your comments prompted us to look for an answer, and we found one. Special thanks to Jessica, who discovered the solution while proofreading dissertations in her spare time.
The key to using different types of numbering in the same document is section breaks. Once you’ve added a section break to your document (you can add as many as you need), you’ll be able to restart your page numbers there and/or apply a different style.
Here’s an overview of the steps you need to follow. These steps should work for Word 2007, Word 2010, and Word 2013.
Imagine you’re working with a really long document in Microsoft Word, like an academic paper or a big report. Depending on the project, it might be dozens or even hundreds of pages long! When a document is this large, it can be difficult to remember which page has what information. Fortunately, Word allows you to insert a table of contents, making it easy to organize and navigate your document.
A table of contents is just like the list of chapters at the beginning of a book. It lists each section in the document and the page number where that section begins. A really basic table of contents might look like this:
You could create a table of contents manually—typing the section names and page numbers—but it would take a lot of work. And if you ever decide to rearrange your sections or add more information, you’ll have to update everything all over again. However, with the right formatting, Word can create and update a table of contents automatically.
We’ll use Word 2013 to show you how to create a table of contents, but you can use the exact same method in Word 2010 or Word 2007.
If you’ve already read Styles lesson, you know they’re an easy way to add professional text formatting to different parts of your document. Styles also serve another important purpose: adding a hidden layer of organization andstructure to your document.
If you apply a heading style, you’re telling Word that you’ve started a new part of your document. When you insert the table of contents, it will create a section for each heading. In the table of contents above, each chapter uses a heading style, so there are four sections.
To apply a heading style, select the text you want to format, then choose the desired heading in the Styles group on the Home tab.
Now for the easy part! Once you’ve applied heading styles, you can insert your table of contents in just a few clicks. Navigate to the References tab on the Ribbon, then click the Table of Contents command. Select a built-in table from the menu that appears, and the table of contents will appear in your document.
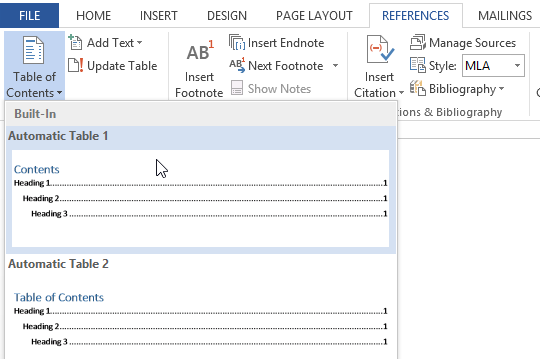
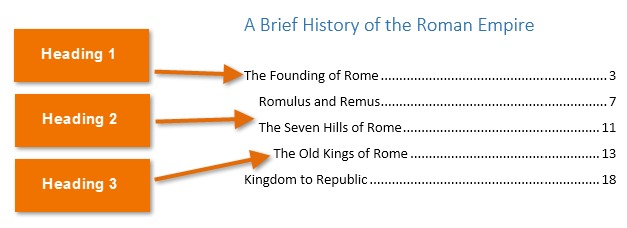
As you can see in the image below, the table of contents uses the heading styles in your document to determine where each section begins. Sections that begin with a Heading 2 or Heading 3 style will be nested within a Heading 1 style, much like a multilevel list.
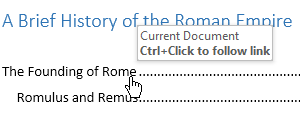
A table of contents also creates links for each section, allowing you to navigate to different parts of your document. Just hold the Ctrl key on your keyboard and click to go to any section.
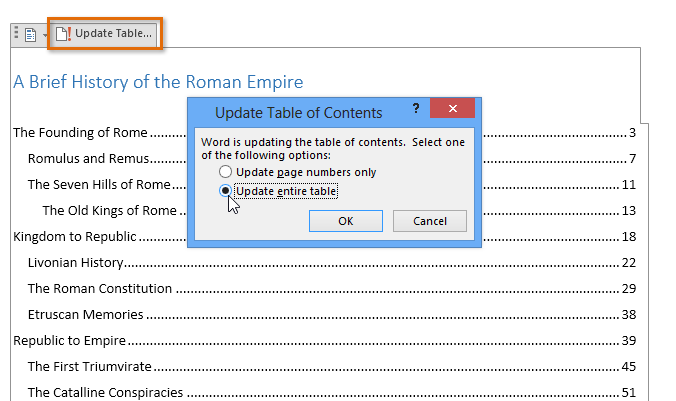
If you edit or add to your document, it’s easy to update the table of contents. Just select the table of contents, clickUpdate Table, and choose Update Entire Table in the dialog box that appears. The table of contents will then update to reflect any changes.
No matter how large your document may be, you can see there’s nothing complicated about creating a table of contents.
If you need to write a research paper, chances are you’ll also be required to include a bibliography. Or you might be asked to include a works cited page or a list of references. These are all just different names for the same thing: a list of sources—such as books, articles, or even websites—that you used to research and write your paper. A bibliography makes it easy for someone else to see where you found your information. A short bibliography might look something like this:

You could create a bibliography manually, but it would take a lot of work. And if you ever decide to add more sources or use a different reference style, you’ll have to update everything all over again. But if you take the time to input your sources into Word, it can create and update a bibliography automatically. This can save you a lot of time and help ensure your references are accurate and correct.
We’ll use Word 2013 to show you how to create a bibliography, but you can use the exact same method in Word 2010 or Word 2007.
When you’re creating a bibliography, you’ll need to follow the guidelines of the required style guide. Different academic disciplines use their own styles guides, such as MLA, APA, and Chicago. Fortunately, Word comes with several built-in style guides; all you need to do is select the one you want to use, and Word will help you format your bibliography correctly.
To do this, click the References tab, then select the desired style in the Citations & Bibliography group.
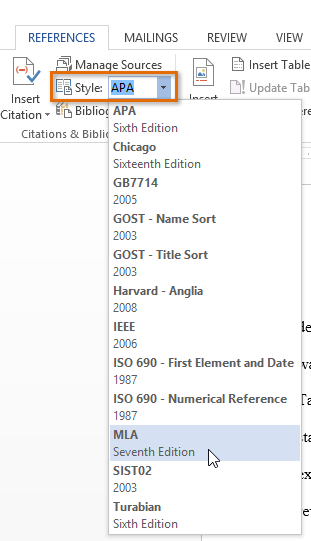
You can use this same method to change the reference style at any time.
Whenever you use information from one of your sources, you’ll need to give credit—or cite them. This is known as making a citation. You’ll include citations whenever you use information from a source or when you quote a source directly.
To add a citation, select the desired location for the citation in your document, click the Insert Citation command on the References tab, and select Add New Source.
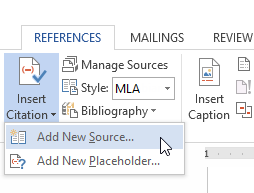
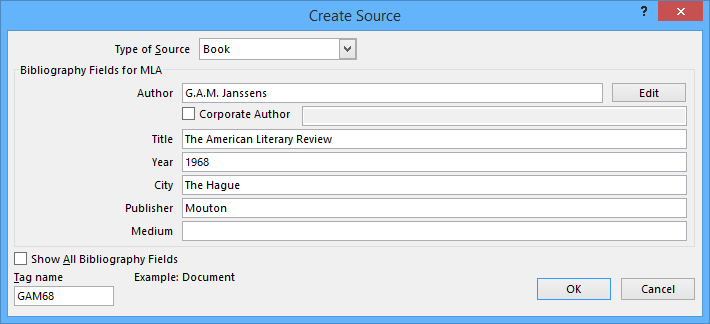
A dialog box will appear. Enter the requested information for the source—like the author name, title, and publication details—then click OK.
The citation will appear in the document, and the source will be saved. You can quickly add another citation for the source by clicking Insert Citation and selecting the source from the drop-down menu.

Time for the easy part! Once you’ve added all of your sources, you can create your bibliography in just a few clicks! Just select the Bibliography command, then choose the desired style.
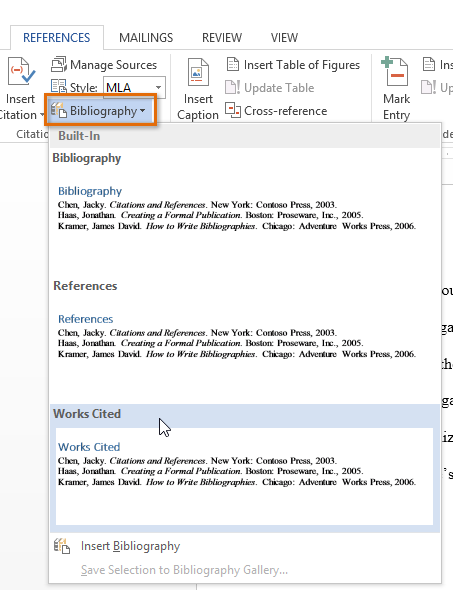
The bibliography will appear at the end of your document. Your sources will already be formatted to match the selected style guide. You should still double-check each of your sources against your style guide to make sure they’re correct. If you need a quick reference for MLA, APA, or Chicago formatting, we recommend the Purdue Online Writing Lab.
If you add more sources to your document, you can easily update your bibliography—just click it and selectUpdate Citations and Bibliography.

No matter how many sources you include in your document, Word’s built-in tools make it easy to create and organize a bibliography.
There may be certain settings in Word that get on your nerves, like default settings that you find yourself changing over and over—the paragraph spacing, the font size—each time you start a new document.
Maybe you prefer a different font style instead of the default Calibri. Maybe you like all of your documents to have narrower margins so you can fit more information on the page. Maybe you even work for a company that has very specific document standards—regarding the color scheme or layout—and you’re tired of changing these settings every time.
Luckily, you can customize many of the default settings in Word. You just have to know where to look.
You can’t change the default settings for everything in Word, but there are certain tools and features that give you this option. Popular examples include:
To find out if you can customize the default settings for a certain element, look for an arrow in the bottom right corner of the group. This will open a dialog box where you can access all of the basic settings, plus some more advanced ones that you won’t find on the Ribbon.

Next, look for a button near the bottom of the dialog box that says Set as Default. All you have to do is click this button, and Word will assign your current settings—like the font or font size you’ve chosen—as the new default for this particular element.
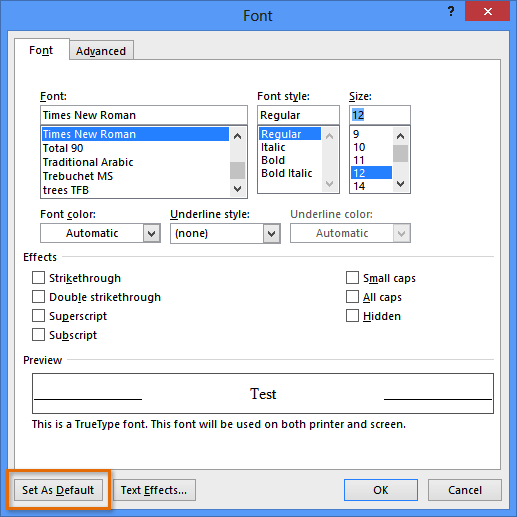
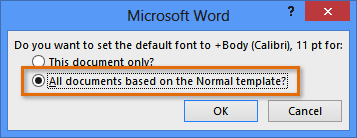
Finally, Word will ask whether you want to set this as the default for this document only, or for all documents based on the Normal template (in other words, all documents in the future). Choose the second option, and Word will use these settings from now on.
If you don’t have a lot of experience with Word, you may want to stick with the original default settings—any changes you make will be permanent, unless you change them back manually. But for more experienced users, this can be a great way to set up Word exactly the way you want.
If you are experiencing a problem getting your default changes to save, it might be an issue with your computer or your copy of Word. For help, we recommend visiting Microsoft’s support site.
If you’ve ever used Microsoft Word, you’ve probably spent a lot of time customizing different options to get your document to look exactly the way you want. But have you ever created a document for other people to use?
For example, let’s say you’re organizing a field trip and want everyone to send in their permission forms electronically. To simplify the process, you could create a form in Microsoft Word. A form allows you to create placeholders for different types of information, such as text, dates, yes-no questions, and so on. This makes it easier for everyone to know what type of information to include, and it also helps ensure all of the information is formatted the same way.
We’ll use Word 2013 to show you how to create a form, but this should work the same way for Word 2010 or Word 2007. You can also download our example file if you’d like to follow along.
Before you create form elements in a document, you’ll need to activate the Developer tab on the Ribbon. To do this, click File > Options to access the Word Options dialog box. Select Customize Ribbon, then click the check box for the Developer tab.

The Developer tab will appear on the Ribbon.

Now you’re ready to add the different parts of the form, which Word calls content control fields. To add a content control field, place your cursor in the desired location, then choose a field from the Controls group on theDeveloper tab. You can hover your mouse over the fields to see the different options. In this example, we’re adding a text field so users can type their first names.

The content control field will appear in the document.

You can add several types of fields. For example, you can add check boxes for a yes-no question:

Or even a date selection field:

Once you’ve added all of your fields to the document, you’re ready to send out the form for others to use!
If you want even more control over the way your form looks, you can turn on Design Mode from the Controlsgroup on the Developer tab.

Then you can modify the properties for each content control field, including the text that will appear in each field. If you’re willing to spend a little more time customizing each field, you can build a pretty robust form. For example, you could create your own custom drop-down list, as in the example below:

Those are the basics of creating your own custom form in Microsoft Word. If you want to learn more, check out this article from Microsoft on how to Create a Fillable Form.
Themes can be a great way to make your PowerPoint presentation or Word document look nice, but sometimes you might want to add custom design elements to your project. Custom formatting can be tedious, though, especially when you’re doing a lot of it. For instance, take this PowerPoint slide. Let’s say you’ve applied a series of effects to the photo on the left, and now you’d like to do the same to the photo on the right.

You could try to remember all of the effects applied and apply them to the second photo as well—or you could save some time and use the Format Painter. The Format Painter is a tool in Word and PowerPoint that lets you copy all of the formatting from one object and apply it to another one. Think of it as copying and pasting for formatting.
Using the Format Painter is easy. Here’s how:
1. Select the object with the formatting you want to copy.

2. Click the Format Painter icon. It may be located in a slightly different place, depending on your version of Office, but it always looks like a paintbrush.

3. Select the object you want to apply the formatting to. The object will be formatted.

See? Simple! That was much quicker than applying the individual effects one at a time. If you want, you can even use the Format Painter to apply the formatting to multiple objects. Just double-click the Format Painter icon instead of clicking it once.

Even though we only looked at using the Format Painter for photos in PowerPoint, you can use it for anything you can apply formatting to in Word or PowerPoint. This includes text, table cells, and shapes. Once you start using it, you’ll be surprised how often it comes in handy.
If you’ve ever used Microsoft Word, there’s a good chance you’ve needed to print a document. While Word’s printing options are more advanced than some of the other programs in the Office suite, it can still be difficult to get printed documents to look exactly the way you want.
That’s why we’ve put together this list of tips. Keep these in mind the next time you need to print a document, and you’re sure to have better results. These tips should work the same way for Word 2013 and Word 2010. If you’re using Word 2007 or earlier, you can make many of these changes in the Print dialog box.
Before you print anything, you’ll want to preview it. Just go to File > Print to see a preview of your document. From here, you’ll also be able to adjust different page layout and printing settings, such as the page orientation, paper size, and margin width. Any changes you make will be updated in the preview pane as well.

There may be times when you need a way to make your document take up fewer printed pages. One of the easiest ways to do this is by using smaller margins. Just go to the Page Layout tab, click Margins, then select Narrow(you can also select Custom Margins for even smaller margins). Keep in mind that using very small margins may cause some text to be cut off by your printer.

We’ve found this especially helpful if you have a multi-page document with just a few sentences on the last page. Making the margins smaller will bring the text up, which will usually remove the extra page.
Double-sided printing is another great way to save paper. Double-siding printing options can vary, depending on your printer.
Go to File > Print and select the menu just below the Pages: field (if you’ve never changed this option before, it will say Print One Sided). Select Manually Print on Both Sides, then print your document. One side of the page will be printed, and you’ll then need to reload the page into the printer to print the other side.

With some printers, you’ll also have the option to Print on Both Sides. If you use this option, your printer will reload and print on the second side automatically.

If you’re using Word 2007, check the option for Manual Duplex in the Print dialog box to print double-sided.
If you’ve used any of Word’s reviewing features with your document, such as Track Changes or Comments, you’ll need to decide whether to include this markup in the printed version. For example, if you’re still in the review process it may be helpful to include comments. If you’re printing a final version, you’ll probably want to turn these off. To do this, go to File > Print, click the very first menu below Settings (it will usually say Print All Pages), and select Print Markup to uncheck this option.

If you’re printing multiple copies of the same document, it’s a good idea to print a test copy first. This is especially true if the document has a unique design, like a holiday card or poster. A test copy will let you see whether the document looks the way you want, and you can then make adjustments before printing the final version.

We hope these tips will come in handy the next time you need to print a Word document.